PAINTING POWER WEAPONS By Zach Tong |


THE BASICS |


Initial concepts and Thought Process: In this article i'm going to try and show you how to paint up a pretty decent power weapon. I'm sure all of you have drooled at one time or another over amazing work, and always wondered how to do it. Well, i have to (actually, still am) and i'd like to pass along a bit of that wisdom to you. I'm not saying my work is great, or even good, just showing a teqnique that an elder at my local gaming store showed me. With that said, lets start! |
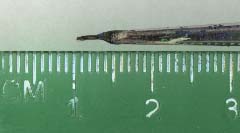
To begin, you have to have a rather small paint brush. The one to the right i think used to be a 10/0, but now after much use and scraping off paint, has become smaller. This is what i use for small detail work. **BE WARNED** If you look closely at the base of the bristles, you can see a large pile of paint. NEVER let this happen tou your brushes. I'd remove it, but I fear that it will take all the bristles with it. Always clean your brushes out thoroughly, else this happen to yours. Another side note, almost all painting was done with the paint watered down. This makes it easier to work with, and blends better. Water it down to milk consistency, or even more. It never hurts to put more layers on because one doesn't show up then scrap the whole thing because one shade is too bright. |
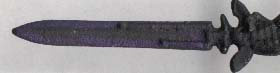
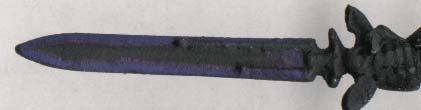
Stage 1: In the first step, I took watered down Royal Blue and painted a line around the entire edge of the sword. |
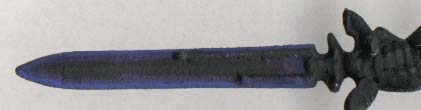
Stage 2: Now I mixed some Royal Blue with a Ral Partha paint named True Blue. This was painted on next, just inside of the first line. To ensure a smoother transition, its usually safer to do many layers of small color increments, as opposed to three shades that are quite different. |
Stage 3: I mixed more Royal Blue with True Blue, at more of a 50/50 consistency, and once again painted it on. |
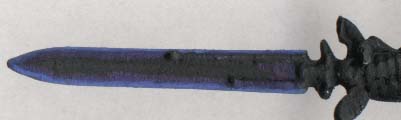
Stage 4: Here I used only True Blue and painted the line on. |
Stage 5: In this next step I added a mixture of Lightning blue with True Blue to the edge. I don't believe it is visible in the picture, but shows up well in real life. |
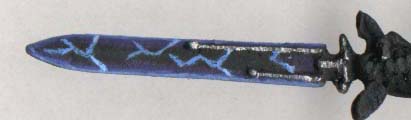
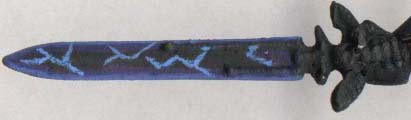
Stage 6: Here is the the really tricky part (in my opinion). This is the part where you'd better hope you have steady hands! Take some paint out of the pot and wipe it off on some cardboard or something. now dip your brush back into the paint you just wiped off and pick up a little bit of paint (tiny amount!). This is easier than getting it from the pot as you can over dip in the pot, and have too much paint. Now take your brush and stroke diagonal lines radiating from the edge. You will have to get more paint after each stroke or so (I usually have to get more paint 2-3 time per line segment, not the whole line). Use your creativity to make an interesting design. Be quick though, the small amount of paint on your brush dries quickly. |
Stage 7: Here is the last step. Mix together some Lightning blue and Skull White, to get a really light blue. Take a small amount of apint (as described above) and paint inside the lines you just made, but only where it meets the edge. This is extremely difficult for the begginer, and took me along time to get decent at. Really good painters can take and paint up the entire shaft of the line, but i prefer (and can only do) the edge. Then take some boltgun metal or similar metal, and paint the antennae looking things. There! You've just made a power weapon. Any color can be used. I've done green and blue, and once red. Try out different colors. This also looks great on axe's or similar weapons. Keep trying new things, as thats the only way to get better. And thats coming from someone that isn't very good, but has gotten a whole lot better through many, many messed up minatures! |
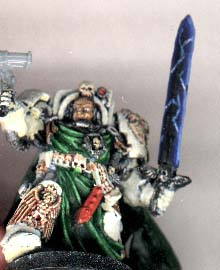
Here's an example of a power sword on my terminator Captain. To learn to paint the captain, visit the painting the Deathwing model, which is where i learned. And the cape was made like the Master of the Deathwing one also shown on this site. Good Luck! |
">

">
">
">
">
">
">
">
">
">
">
">
">
">
">
">

">
">
">
">
">
">
">
">
">
">
">
">