

HAND PAINT DEATHWING SYMBOLS By C J van der Have ( Brother Lorien ) |


THE BASICS |


">

">
">
">
">
">
">
">
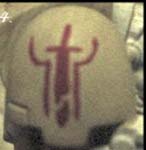
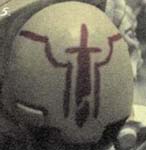
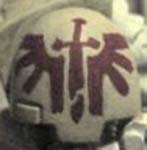
Initial concepts and Thought Process: Painting a deathwing symbol freehand is not as difficult as it seems , you just need a slightly steady hand and some insight into the shoulderpad of a terminator. I have done a few dozen deathwing symbols for my own, old DW army (which I have sadly sold) and a few dozen more for friends along with other symbols for spacemarine and chaos armies. Now I know , your going to think, "well, he's have done them a zillion times, and he's got loads of practice doing it" and you would be damn right. Practice does make perfect, but, let me add that what you mess up you can always touch up. The following example was completed in just three minutes!. |
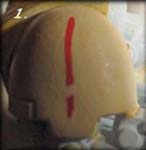
Stage 1: Preparation. First take the terminator pad (the easiest one to do a symbol on) and take a good look at it. You'll notice that on the lower end of the pad at the arm there is this square outcropping that is right in the middle of the shoulderpad. This should help you with centering the icon on the shoulderpad. For normal tactical shoulderpads this should work the same but you have to be very aware of how the shouldrpad is on the mini (tilted towards the back or towards the front, a bit up, a bit down...) So try to think about the mini behind the Shoulderpad and then start off by finding the centre of it ( you can use the small openings on the lower end of the shoulderpad to do this ). Draw a line from the top of the sword to the point of the sword, but remember to leave a part open where the sword is broken (TILL THE SWORD IS REFORGED!). |
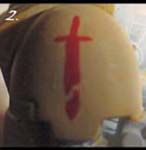
Step 2: Once you are satisfied with the lenght of the sword start to shape the blade, still keeping the broken part clear. Remember that the angle the sword is broken at. It is like a bolt of lightning. Add the heft (hand guard) and the sword is finished to a degree that you can start on the wings. |
Step 3: Start with the right side of the verical left feather and the left side of the vertical right feather, paint them along the blade of the sword with about a 1 mm (or less) space between AND stopping the lines before you get to the hand guard. |
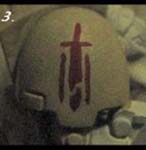
Step 4: Draw a quarter circle from the end of both lines towards where you want the horizontal feathers to come. |
Step 5: Now, paint the top feathers on, and extend them horizontally to the length you want. |
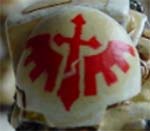
Step 6: Thicken both the horizontal and vertical feathers and you will notice that it starts to resemble a deathwing symbol, You now need only to add the middle two feathers on both wings and you are almost done. The handle of the sword and the hand guard of the word both have diamond shaped ends, but you can leave those off if you want to. |
Conclusions: There you have it! one free hand painted Deathwing symbol completed in exactly three minutes. I usually spend about ten minutes on each Deathwing symbol. You can see that the overall effect is one that is very close to or even better than using decals. |
">
">
">
">
">
">
">
">
">
">
">
">
">
">
">
">

">
">
">
">