INTRODUCTION: The following tutorials were something I promised to do for Shadow Guard as part of the Raven Wing Project I am working on for him. Most are quick and easy. They aren't meant to give you tips on winning a golden demon or any other painting prize. They are however a way to have a decent looking army in a short amount of time. Many times in these tutorial your going to see non-GW paint names. I have nothing against GW paint, I think it is great stuff. The bottles for it on the other hand..bleh. So where possible I will include a GW equivalent (or close enough for government work) for the colors I use. That said, please understand that these are how I do these particular things. It is not the Games Workshop way, the Cool Mini or Not way, heck some might say it is not even the "right" way. All I can promise is that it works and if you choose to follow it, your army will at least be presentable on the table. Above anything though I hope that folks who are looking to start painting or improve their painting can learn something. So any comments / critiques you want to fire at me feel free: [ email: menshakhaine@hotmailcom ] The steps for the robe tutorial show how to do it in layers. You can achieve a more uniform look by blending, just remember that it does take more time. |

BASES FOR SPACE MARINES By Matthew Hunt ( Kurgan ) |


THE BASICS |
This is the first of a series of painting and modelling articles that have been created by my good friend Matthew Hunt specifically aimed at helping gamers and hobbyists who play the Dark Angels and their unforgiven brethren. I am eternally grateful for his support for my work in maintaining this site and for the superb series of articles that are published in this section. To see more of his excellent work, feel free to press the icon above on the right which will take you his own web site, "The Duck Blind Miniatures." |
INTRODUCTION: The following tutorials were something I promised to do for Shadow Guard as part of the Raven Wing Project I am working on for him. Most are quick and easy. They aren't meant to give you tips on winning a golden demon or any other painting prize. They are however a way to have a decent looking army in a short amount of time. Many times in these tutorial your going to see non-GW paint names. I have nothing against GW paint, I think it is great stuff. The bottles for it on the other hand..bleh. So where possible I will include a GW equivalent (or close enough for government work) for the colors I use. That said, please understand that these are how I do these particular things. It is not the Games Workshop way, the Cool Mini or Not way, heck some might say it is not even the "right" way. All I can promise is that it works and if you choose to follow it, your army will at least be presentable on the table. Above anything though I hope that folks who are looking to start painting or improve their painting can learn something. So any comments / critiques you want to fire at me feel free: [ email: menshakhaine@hotmailcom ] The steps for the robe tutorial show how to do it in layers. You can achieve a more uniform look by blending, just remember that it does take more time. |


Stage 1: Base prep. There are a couple of different ways to go about this. Obviously you want to file down and flash on the base from where it was connected to the sprue. It is what you do next that is up to you. You can either a) scuff up the base with a file or b) prime over it with varnish or primer. Reason I do this is to make it easier when spreading the white glue down for the basing sand. Without it you tend to get a kind of capillary action and the glue beads together in places, leaving others bare. |
Stage 2: After you have put down the first coat of white glue, dip the base in your sand of choice. I use a mix from Woodland Scenics [link: http://www.woodlandscenics.com]. Once that has dried you can put down a coat of watered down white glue over the top to seal the gravel in. Priming over this will give you a further layer of seal over the gravel. |
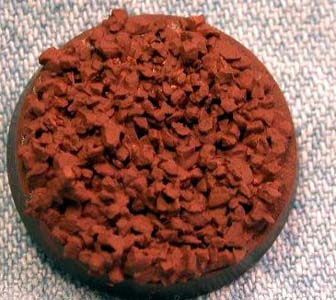
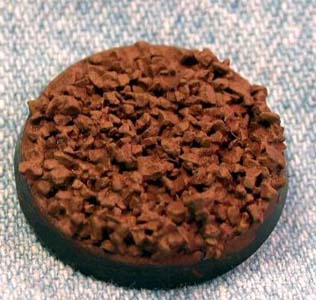
Stage 3: For the first coat on a base I use Iron Wind Metals Dark Brown (GW Dark Flesh). |
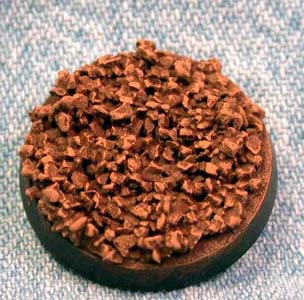
Stage 4: This is the first of several dry brush coats over the gravel. This is done with Ral Partha Flesh Tone #10 (GW Scorched Brown). |
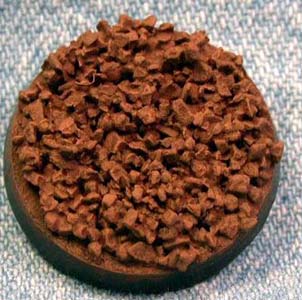
Stage 5: Next you have another dry brush of Ral Partha Cleric Brown (GW Snakebite Leather). |
Stage 6: This next dry brush coat was done with Ral Partha East Indian Flesh (GW Desert Yellow). |
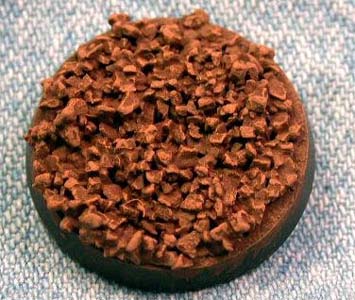
Stage 7: The final dry brush was done with Ral Partha Warrior Flesh. (GW Dwarf Flesh). |
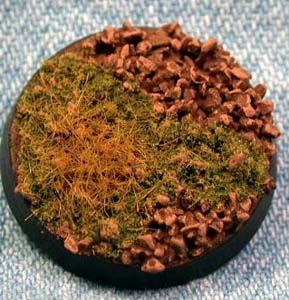
Stage 8: The last step here is to put on flock and or static grass. I tend to save this till the very last on any mini (once the whole thing is done). Once this down and dry you can dry brush the grass if you want, as static grass tends to shine a bit on its own. |
">

">
">
">
">
">
">
">
">
">
">
">
">
">
">
">
">
">
">
">
">
">
">
">
">
">
">
">
">
">
">
">