The following tutorials were something I promised to do for Shadow Guard as part of the Raven Wing Project I am working on for him. Most are quick and easy. They aren't meant to give you tips on winning a golden demon or any other painting prize. They are however a way to have a decent looking army in a short amount of time. Many times in these tutorial your going to see non-GW paint names. I have nothing against GW paint, I think it is great stuff. The bottles for it on the other hand..bleh. So where possible I will include a GW equivalent (or close enough for government work) for the colors I use. That said, please understand that these are how I do these particular things. It is not the Games Workshop way, the Cool Mini or Not way, heck some might say it is not even the "right" way. All I can promise is that it works and if you choose to follow it, your army will at least be presentable on the table. Above anything though I hope that folks who are looking to start painting or improve their painting can learn something. So any comments / critiques you want to fire at me feel free: [ email: menshakhaine@hotmailcom ] The steps for the robe tutorial show how to do it in layers. You can achieve a more uniform look by blending, just remember that it does take more time. |

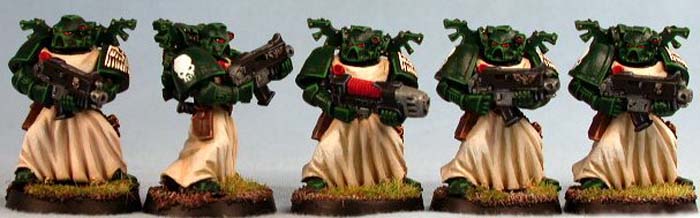
PAINTING SPACE MARINE ROBES By Matthew Hunt ( Kurgan ) |


THE BASICS |
This is the first of a series of painting and modelling articles that have been created by my good friend Matthew Hunt specifically aimed at helping gamers and hobbyists who play the Dark Angels and their unforgiven brethren. I am eternally grateful for his support for my work in maintaining this site and for the superb series of articles that are published in this section. To see more of his excellent work, feel free to press the icon above on the right which will take you his own web site, "The Duck Blind Miniatures." |
The following tutorials were something I promised to do for Shadow Guard as part of the Raven Wing Project I am working on for him. Most are quick and easy. They aren't meant to give you tips on winning a golden demon or any other painting prize. They are however a way to have a decent looking army in a short amount of time. Many times in these tutorial your going to see non-GW paint names. I have nothing against GW paint, I think it is great stuff. The bottles for it on the other hand..bleh. So where possible I will include a GW equivalent (or close enough for government work) for the colors I use. That said, please understand that these are how I do these particular things. It is not the Games Workshop way, the Cool Mini or Not way, heck some might say it is not even the "right" way. All I can promise is that it works and if you choose to follow it, your army will at least be presentable on the table. Above anything though I hope that folks who are looking to start painting or improve their painting can learn something. So any comments / critiques you want to fire at me feel free: [ email: menshakhaine@hotmailcom ] The steps for the robe tutorial show how to do it in layers. You can achieve a more uniform look by blending, just remember that it does take more time. |
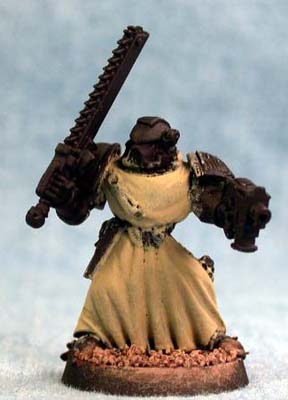
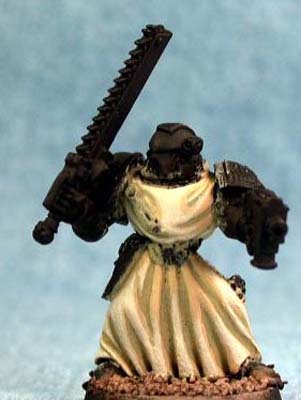
Stage 1: As with any miniature, you prime it first. I prime 99% of the stuff I do in black. White, gray, brownyou can use whatever you want for a primer, I just prefer black. |
Stage 2: First color onto robe that I use is Ral Partha Tan (GW Desert Yellow), though some folks like to use browns as well. Of course if your doing robes in colors other than the Dark Angels bone white style your base color will vary. Depending on how much your thinning your paints (and you know you should be) this could take between 2 and 4 coats. |
Stage 3: The next color is GW Bleached Bone. Again this may take several coats depending on how thin your paint is. |
Stage 4: The next layer is a color by NITRO called Bone. Near as I can tell this is basically a 2 parts Bleached Bone to 1 part Skull White mix. This is applied just like any other layered highlight. |
Stage 5: This step could be your final layer if you wish. The color I use here is Vallejo Ivory, GW doesn't really have an equivalent color but a 3-1 or 2-1 Skull White to Bleached Bone mix would make a suitable color. |
Stage 6: If you want to add one more layer you can go for straight Skull White in the highest points on certain portions of the robe. Crown of the knee, collar, etc. |
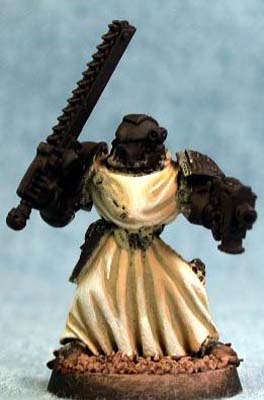
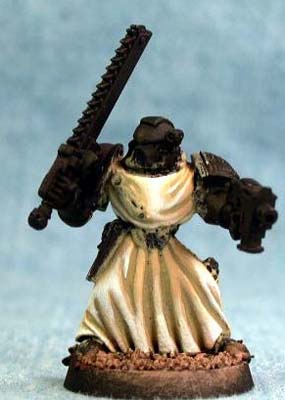
Final Product: The pictures above were done with a bit of exaggeration and not much thinning. This was more to help show where the colors went than to show how the final product can look. |


">

">
">
">
">
">
">
">

">
">
">
">
">
">
">
">
">
">
">
">
">
">
">
">