MODELING A TECHMARINE ON A BIKE By ( Rich ) |


MODELLING THE UNFORGIVEN |


This article has been published here with the express permission of ( Rich ). |
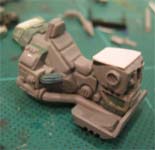
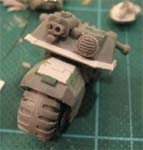
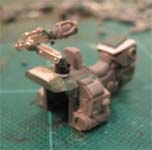
Step 8 - These are two photos of both sides of the bike body. In the first one it shows , what I think of, an auxiliary power pack, using the bikes engine to power up damaged vehicles. The cabling running into the body is still wet green stuff and is obviously still being worked on. The second photo shows the cut down area for the spare servo arm and underneath it the parts so far. The jaws came off one of the techmarine arms (as the old servo arm claw is nasty) and I just cut and green stuffed it to shut the jaws. The black plastic has had cog teeth modeled as Im starting to match it to the mechanism within the normal servo arm next to it - as if the two can be swapped in and out. |
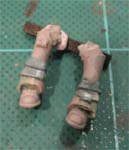
Step 9 - The Techmarine's legs slowly coming along as well. Although some of the GS is still wet here, needing a little smoothing out later before any more of the detail is added. |
">

">
">
">
">
">
">
">
">
">
">
">
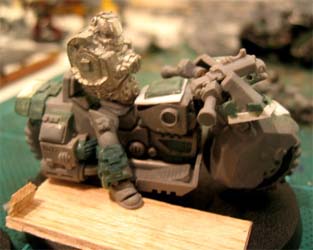
Step 13 - A little more work focusing on the rider. All I have really done is sculpted on more of the cog tooth patterns on the layered leg armour. However, I decided to go with a more stationary pose, him resting one foot down. So I did a little cutting to get his leg into the right position. He will |
Step 14 - I'm also going to square out his foot and thighs to be just like the current metal techmarines. Done a little work on his left arm but his right arm is going to have to wait until the torso and legs are joined to get the pose right as this hand will be holding his axe - which involves reworking the axe (from the mail order techmarine) to be help by a right, rather than, left hand. Juts noticed in the background of that last photo is, a very blurry, techmarine, the slight red smudge really is all it is. The old Jes Goodwin command squad one Although he involuntarilly dontated his servo arm to this project when I realised that I hadnt ordered one amongst everything else I got delivered . Will have to rectify that sometime The spare servo arm needs a little more work as the jaws are just pinned to the arm itself. Im going to graft the techmarine's right shoulder pad onto the riders arm. I sculpted a kind of wrist guard which I will copy on the other arm - its a bit rough at the moment, but will make the shape a bit crisper and detail it a bit. I hope these will look good, will just drop them if not. I want to sculpt the chapters iconography onto the left hand side of the front wheel arch. Thought it would be cool if it was sculpted to look like stone, with maybe a few cracks and chips in. |
">
">
">
">
be resting his foot on a pavement, having drawn up near the curb (at the moment). I found its actually a deceptively long distance between seat and floor so only his boots toe will be taking the bikes weight, but that's ok I think. Needing plenty more green stuff to finish that leg, and if fact the rider |
Step 12 - I made a start on the holster for the marine bolter. Only mapped out the shape again, once its dry I will work on the rest as well as adding securing flap - like the chaplain bikers bolter holster (I didn't use this because some flaps are blowing the wrong way and now I can use the techmarines bolter in it too). I have yet to put on a grip for the bolter. As well as sculpting some of the cogs teeth patterns needed. |
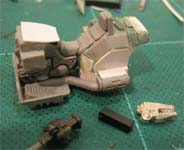
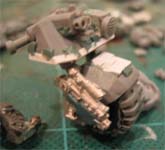
Step 10 - The Then there's the front forks, I cut these off as the marine will be slightly turning the handlebars. The storm. I originally sculpted a cog tooth pattern around the rim where the plasticard strips are but I wasn't quite happy with it so started over with plasticard to which Ill add the cog tooth details. As well as the storm bolter's ammo feed which will run around into the bike body once the two parts of the bike are finally together. |
">
">
">
">
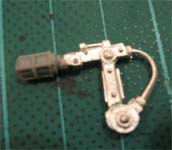
Step 11 - Lastly, I thought the techmarine would need a mobile light source for night repairs and so quickly made this, a servo arm with light fitting for mounting behind his seat. I wanted to know however if anyone actually likes this, firstly as a concept, and also if this part would work on the bike and does it actually look any good? Or would the marine just have some form of infra red in his helmet/eyes? This is just a preliminary idea, so if I include it then I may cut the arm up to have it folded flat behind the seat - just ready for use. |
">
">
">
">
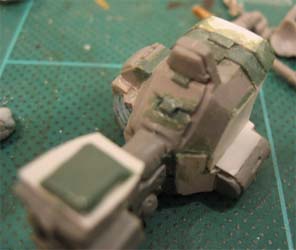
I worked on the lights arm a bit to close the arm and made the light shorter too, I think this looks much less ungainly. Also, above what was the fuel tank, you can see my start on the larger on board computer. All I have done is basically shaped the screen, but I will add some buttons and also a rider interface cable - seems too cool to go without. The green stuff is pretty rough at the moment - just a stop gap really - trust me |
">
">
">
">
Step 13 - And lastly, a little idea I had for any blinged up techmarine. Customised adeptus mechanicus cog teeth seat cushions |
">
">
">
">