

THE LAZY PAINTER'S GUIDE DARK ANGELS SPACE MARINE By Chris LS |


PAINTING THE UNFORGIVEN |


This article has been published here with the express permission from Chris LS. |
I am a lazy painter. I freely admit this, and feel that I am not alone. Since many painting tutorials are out there by Golden Daemon winners and art painters, I figured I'd contribute this tutorial for those of us who just want to play our games with a painted army that won't make people think we were 10 years old when we painted it. On the other hand, I've also gotten to the point where I have higher standards for my work than I did in the past. So I want my primary army to be not just passable, but actually attractive and be somewhat competitive in the painting category at tournaments. Unfortunately, this directly conflicts with my laziness. Thus, I have tried to make painting an attractive army as easy as possible. I've included a number of steps that can be just skipped if all you want is an army that won't get you kicked out of a GW store if you try to play with it. Along the way, I've included some principles that I'm calling "Lazy Painters Rules". They're not really rules, I just made them up. However, I've found that if you're going to be lazy and actually paint, they're pretty good ideas to follow. Feel free to follow them or ignore them at your leisure. All paints used in this tutorial are Games Workshop's line of Citadel paints. |
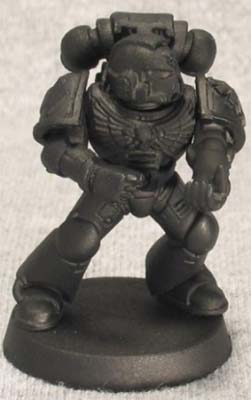
Step 1 - Assembly and Priming Put your Marine together. Notice that I have not glued the bolter onto my Marine, because when that thing is on, it makes priming and painting underneath that bolter a royal pain in the keister. I don't like taking the extra time to cover the area behind the bolter with a brush or do the contortions necessary to paint the chest eagle nicely with the bolter in place. It's really easy to glue it on when you're done, so just leave it off and prime it separately. A suggestion: use your chest eagle Marines for tactical Marines (those with bolters) and use the others (like the single skull or the power cables) for heavy weapons. You pretty much have to put these together before priming, and you can hardly see the eagles anyway, so why put all that work into something no one can see? I use black spray primer for all my minis. Why? Well, spraying is a much easier way to prime a mini than with a brush. I use black because the areas that I miss are generally crevices and crannies that are deep down anyway, so they look like shadows. Use a white primer and they look like you didn't paint it. Once your primer has dried, go back over the areas that the spray didn't cover with a flat black paint. Water it down a bit so it goes down into the cracks nicely. The main reason for this is that if you leave the plastic or metal bare, your later paint layers will look different from everywhere else, which means you have to paint them again. It's much easier to just slop some black paint on now, believe me. |
">

">
">
">
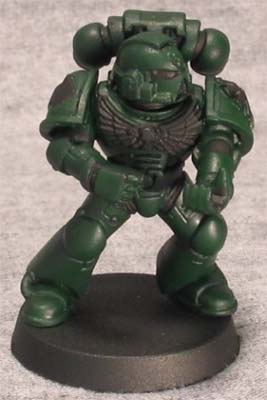
Step 2 - Basecoat OK, here is Lazy Painter's Rule #1: LPR #1: Water down your paints, but not too much: Why would you do this? Isn't it easier to just take it straight out of the pot? Well, yes, it is. But if you do, the paint will be gloppy and leave brush marks on the model. That means you have to go back later and paint over it. I hate painting over an area I've already painted, so I water my paints down instead. It also just looks better and doesn't obscure detail. However, you don't want to go and water down your paints to the point you've got slightly green water. I've heard of painters using 4 parts water to 1 part paint. In my mind, they are insane. Of course, many of them have Golden Daemons, and there's no way on Earth that I ever will. The problem is this: with a 4:1 or similar ratio, you have to paint an area multiple times in order to get decent coverage. Like I said, I hate painting over an area I've already painted. I use a ratio of about 3 parts paint to 1 part water. I'll just stick my finger into my clean water, shake it off into the paint on my palette, and stir it around with a toothpick. That's about enough to allow you to paint an area once and get a nice coverage without being gloppy. My example model was painted with only one layer of Dark Angels Green watered down as stated above. Notice that I didn't paint what will not be green, like the chest eagle and the eyes. Heck, I've said it enough that it should be Lazy Painter's Rule #2: LPR #2: Don't paint what you don't have to. If it's going to be black, then heck, leave it as straight primer. If it's a problem later, you can always cover it |
">
">
">
">
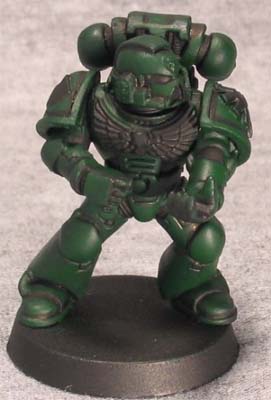
Step 3 - Inking / Dark lining (may be skipped) If you want to improve the depth of your models, dark lining is a great way to do it. You can do it as a part of basecoating, but I personally find this to be a bigger pain than it is worth, so I whip out my black ink and get to work with that. Which brings us to Lazy Painter's Rule #3: LPR #3: Inks are great in moderation. I love to use inks for stuff like this. They are fairly thin, so they seep down into cracks and are fairly transparent on raised areas. However, don't think that this means you should just wash your model down with an ink. That darkens the entire model, covering up your basecoat. What do you need to do then? Repaint much of the basecoat! See LPR #2. I tried an ink wash with my Deathwing and ended up repainting almost the entire basecoat of the army. Never again. Instead, I put a little ink onto a detail brush and hit the areas that need it. On my example model, I used very slightly watered down black ink and inked around the rim of the shoulder pads, in the cracks in the armor, and at the edges of the armor where pieces overlap or come together (fingers, kneepads, parts of the backpack, etc). Don't go crazy here keep your brush from getting too wet with ink or it will flow all over. Time for this stage: 8 minutes |
">
">
">
">
with a little extra black. But I've seen plenty of people go and paint over every part of the model with DA Green (or other color for different chapters), even though it would later be another color. WHY?!? The worst part of it is that you often have to put another basecoat down in order to cover up the green. Just leave well enough alone. At this stage, don't bother cleaning up slops. If it is still an issue when the model is finished, you can fix it then. However, many slops will be covered later with other paints, so ignore them until you know they won't get covered. A note on spray paints: Feel free to basecoat with spray paint! This is a perfectly viable method of basecoating. However, keep in mind that you'll still have to clean up a few areas that the spray will not get to, and that there are other parts that will get covered that you'll need to paint over, such as the joints of the armor and the chest eagle. I'm not using a spray on these minis because I want to see how well I can do without spray. But my next army (Tau) is getting its basecoat out of a can. Time for this stage: 10 minutes |
You'll also notice that I've used the metal shoulder pads on this model. There are two reasons for this. 1) They look really cool. 2) They are much easier to paint than going freehand or using decals. I was able to get these back when you could get bitz by the gram at Games Days in the US, but those days are gone. So if you have more money than patience, the metal shoulder pads are the way to go. If not, use decals. I'll discuss those later. |